Development of locks on the Murray River (volume 2) [B 71136/1-261] • Photograph


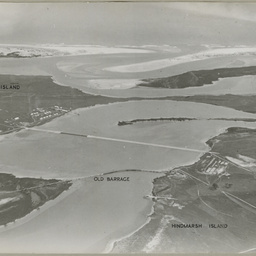
Development of locks on the Murray River (volume 2)
Panorama looking east across Mundoo Island
Development of locks on the Murray River (volume 2)
looking across Mundoo Barrage to Murray mouth

Development of locks on the Murray River (volume 2)
the mouth of the River Murray looking north east

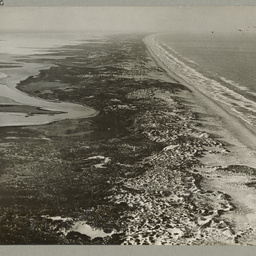
Development of locks on the Murray River (volume 2)
looking east past the Murray mouth

Development of locks on the Murray River (volume 2)
Mundoo barrage 1936

Development of locks on the Murray River (volume 2)
Goolwa barrage 1936

Development of locks on the Murray River (volume 2)
Murray mouth
Development of locks on the Murray River (volume 2)
The Coorong

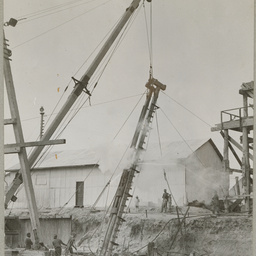
Development of locks on the Murray River (volume 2)
assembling

Development of locks on the Murray River (volume 2)
bottom carriage

Development of locks on the Murray River (volume 2)
pass piles

Development of locks on the Murray River (volume 2)
a worm's eye view

Development of locks on the Murray River (volume 2)
sluices piles

Development of locks on the Murray River (volume 2)
frame and travelling derrick

Development of locks on the Murray River (volume 2)
prototype S.A.H.B.

Development of locks on the Murray River (volume 2)
Larrsen piles

Development of locks on the Murray River (volume 2)
round piles - sluices

Development of locks on the Murray River (volume 2)
driving batter piles in abutment with swinging leads

Development of locks on the Murray River (volume 2)
driving batter piles in abutment with swinging leads

Development of locks on the Murray River (volume 2)
driving batter piles in abutment with swinging leads
Development of locks on the Murray River (volume 2)
driving batter piles in abutment with swinging leads

Development of locks on the Murray River (volume 2)
driving batter piles in abutment with swinging leads

Development of locks on the Murray River (volume 2)
driving Larrsen piles with suspended hammer

Development of locks on the Murray River (volume 2)
driving Larrsen piles

Development of locks on the Murray River (volume 2)
driving Larrsen piles
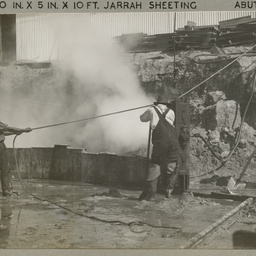
Development of locks on the Murray River (volume 2)
driving 10 in. x 5 in. x 10 ft. jarrah sheeting - abutment

Development of locks on the Murray River (volume 2)
driving 8 in. x 3 in. x 10 ft jarrah sheeting by air - lock

Development of locks on the Murray River (volume 2)
Goolwa barrage - sluices pile foundations

Development of locks on the Murray River (volume 2)
Goolwa barrage - sluices pile foundations

Development of locks on the Murray River (volume 2)
Goolwa barrage - sluices pile foundations