Photographs of Sydney Harbour Bridge during construction [PRG 1377/62] • Photograph


Sydney Harbour Bridge pylon
Pylon with first span of upper arch. The creeper crane worked along arch as work progressed.

Sydney Harbour Bridge pylon
Pylon with first span of lower arch.

Sydney Harbour Bridge arch span
Second span in course of construction.

Sydney Harbour Bridge arch cables
Showing immense cables which helped to hold the arches in position until they finally met.

Sydney Harbour Bridge creeper crane
Showing the creeper crane at extremity of the arch.

Sydney Harbour Bridge riveters at work
Showing the riveters at work. Note the vast number of rivets.

Sydney Harbour Bridge riveters at work
Looking from the North Shore towards the city.

Sydney Harbour Bridge arches in construction
The stone wall encloses a small portion of the Botanic Gardens. The bridge is shown being built from each end (North & South) towards the centre. The creeper cranes are conspicuous. On the right a steel member is being hoisted into position. A very artistic study.

Sydney Harbour Bridge arches joined together
Of great historical interest.The photograph shows the final operation in the joining of the two spans.

Sydney Harbour Bridge arches joined together
Of great historical interest.The photograph shows the final operation in the joining of the two spans.

Sydney Harbour Bridge central hangers
The two central hangers in position. The beginning of the operations for making the railway track and roadway.

Sydney Harbour Bridge floor in construction
Showing progress of work in construction with floor of bridge. A Burns Philp boat passing under the bridge. These boats go to Java & Singapore.

Sydney Harbour Bridge floor in construction
A view that is now a memory. In the building of the roadway the centre hangers were first placed into position. The hangers are the slender uprights. Yhe joining of the arch was the 'BIG THING'. The making of the roadway was simple from an engineering point of view.

Sydney Harbour Bridge floor in construction
Pylon on the left and creeper crane in position in connection with roadway construction.

Sydney Harbour Bridge floor in construction
Shows men at work on floor of bridge. Roadway in centre, two sets of rail tracks & footways at either side. Looking towards the city.

Sydney Harbour Bridge floor in construction
Showing roadway which will later be covered with thick layer of asphalt. On each side two lines of railway and 10 feet footways for 'Ye Citizens of Sydney'.

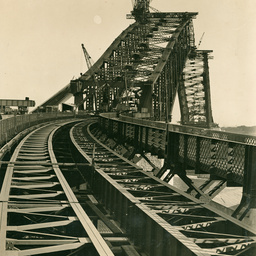
Sydney Harbour Bridge floor in construction
Looking through the bridge, showing the immensity of the steelwork.
Sydney Harbour Bridge approaches
Showing the approaches with railway & pedestrian tracks.

Sydney Harbour Bridge approach
A view of the immediate approach to the bridge.

Sydney Harbour Bridge approach
Showing the approach from North Shore.

Sydney Harbour Bridge steel work
An impressive massed effect which suggests the tremendous weight of steel in the bridge. The pylons at each end are yet to be completed. Photo taken from the North Shore side.

Sydney Harbour Bridge steel work
A glimpse of the city of Sydney through the maze of steelwork. A ferry steamer below.

View from Sydney Harbour Bridge
A view from the bridge of Kirribilli Point showing flats. The 'martello' tower on a wee bit of an island is Fort Dennison ('Pinchgut') where in the early days guns were in position to defend Sydney if necessary.